Quick Copy Extension
July 25, 2021 - Extensions API, Tableau
Update July 9, 2025: Glitch (where I was hosting this extension) has shut down their app hosting. I'm now hosting the extension myself, and you can now find the code on GitHub. Here is the updated trex file.
There are a bunch of ways to grab data from a dashboard. You can download the workbook, or a crosstab, view the summary or underlying data, etc. However, all of these methods require a couple of extra clicks and steps that aren't always intuitive to new users and can add extra overhead to simple tasks. The other day I was looking at a dashboard and I wanted to grab the ID number for the mark I was looking at. Since I do this often on this particular dashboard it got me thinking that there could be an easier way for these little repeat tasks. That's why I made the Quick Copy extension!
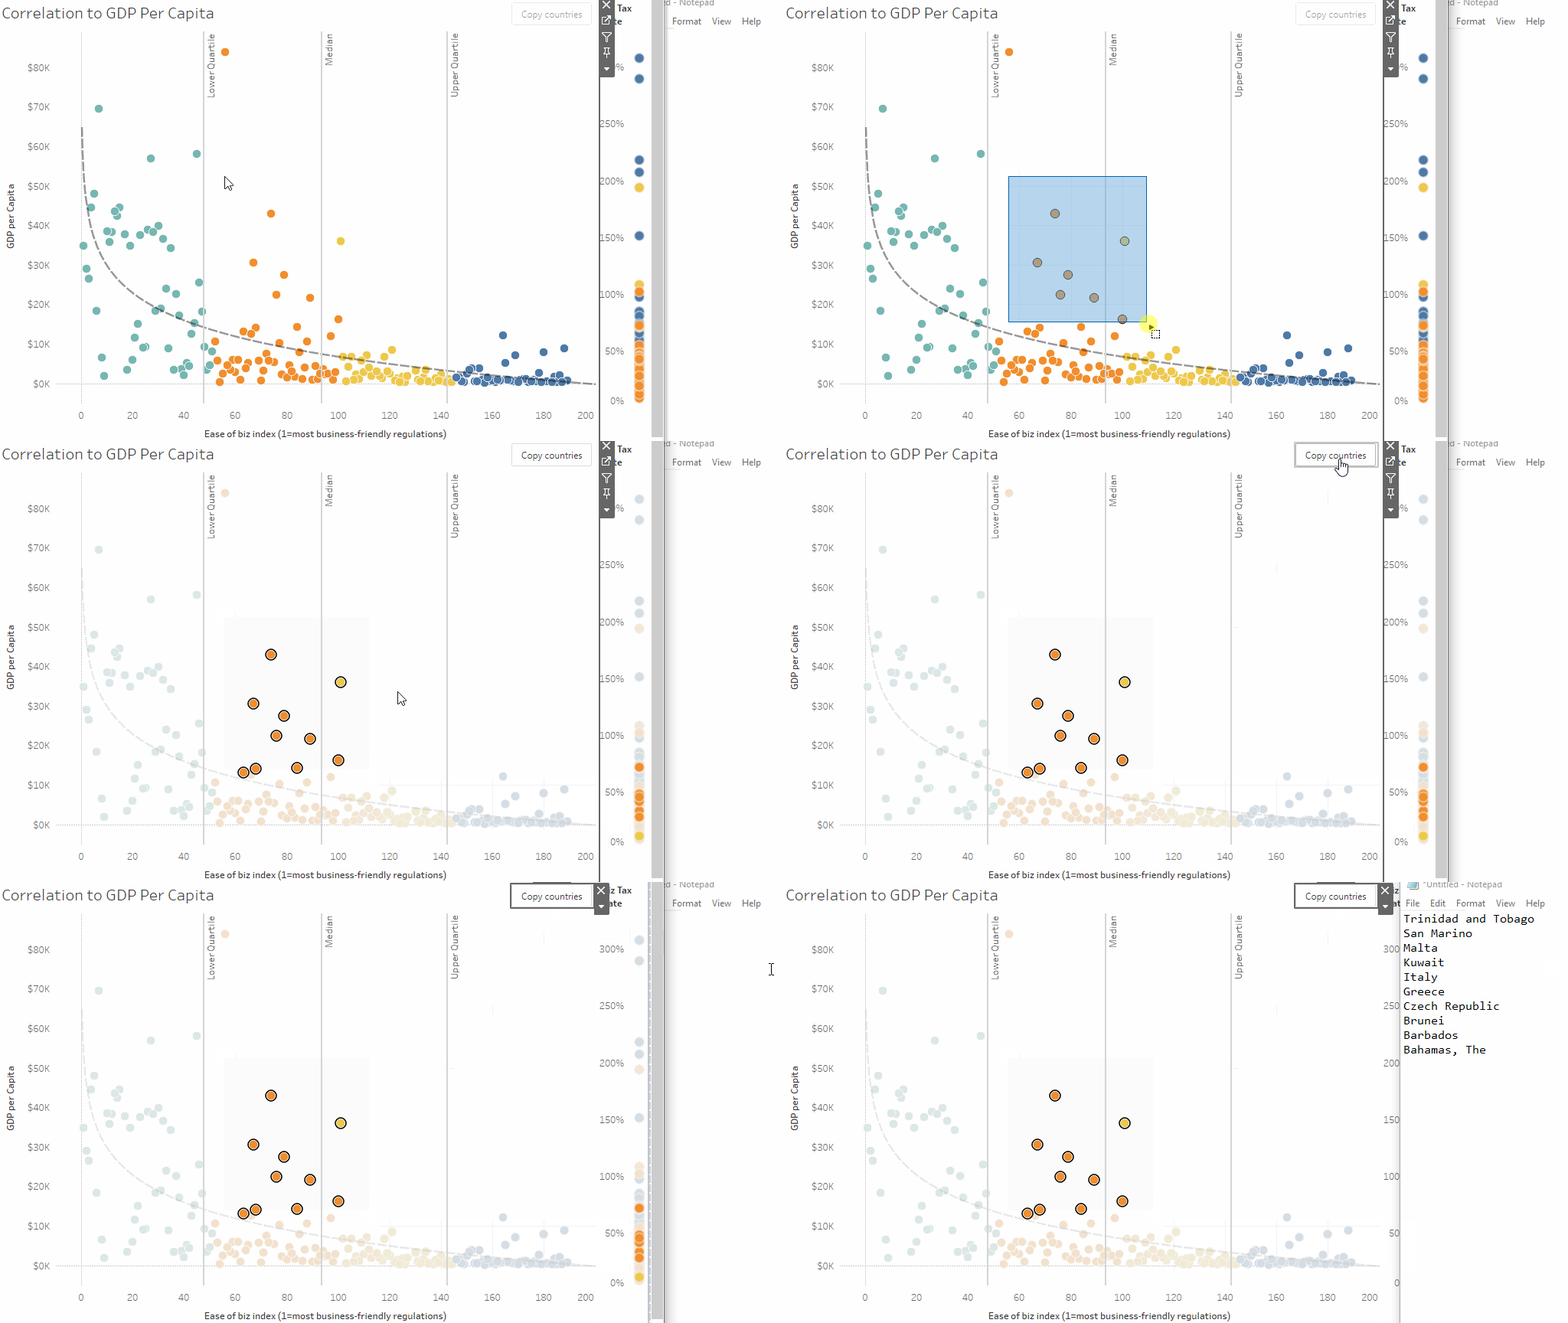
How to use
- First, grab the trex file
- In your dashboard drag in a new extension object and select the trex from your local files.
- Click configure or select Configure... from the context menu on the extension.
- Select the source worksheet you want to copy values from.
- Pick and choose which fields you want to include in the copy.
- If you selected more than one field above you can select a delimiter to separate them. The default is ", " but you can also separate by a tab, a new line, or your own character(s).
- Optionally you can change the label on the button.
- Click Save to save your configuration.
Now that you have the extension set up, select some marks on the worksheet you selected, and then click the button shown in the extension to copy the mark data!
Set up the configuration
So how does this work? You can take a look under the covers to follow along or fork your own version. First, we need to collect some information from the dashboard authors. We need to know which worksheet to get the data from as well as which columns should be included in the copy. For this project, I'm using Vue.js, if you want to learn more about Vue I recommend taking a look at this quick video overview. The first method to look at is getWorksheets:
getWorksheets: function() {
  const settings = tableau.extensions.settings.getAll();
  const worksheets =
    tableau.extensions.dashboardContent.dashboard.worksheets;
  this.worksheets = [...worksheets.map(w => w.name)];
  this.worksheet = worksheets.find(w => w.name === settings.worksheet)
    ? settings.worksheet
    : "";
}
Here we're getting a list of all worksheets on the dashboard and creating an array based on just their names. Finally, we check to see if there are already some settings available and if what is set actually exists as a worksheet on the dashboard. If it does then preselect it. This allows the user to not have to re-enter everything each time they open the config. Based on the worksheet selected we then want to grab the available fields in getFields:
getFields: async function(worksheetName) {
  const settings = tableau.extensions.settings.getAll();
  const selectedFields = settings.fields ? JSON.parse(settings.fields) : [];
  const worksheets =
    tableau.extensions.dashboardContent.dashboard.worksheets;
  const worksheet = worksheets.find(w => w.name === worksheetName);
  if (!worksheet) return (this.fields = []);
  const data = await worksheet.getSummaryDataAsync();
  this.fields = [
    ...data.columns.map(column => {
      const selected =
        selectedFields.find(
          field => field.selected && field.name === column.fieldName
        ) !== undefined;
      return { selected, name: column.fieldName };
    })
  ];
}
This function will take a worksheetName and if that worksheet exists it will use the getSummaryDataAsync function to grab the data. From here we can create an array of objects with each object containing the field name and a selected flag. We'll use the selected flag to determine which fields to include later. I can also check to see if the fields are present in the settings as well to pre-select them.
We want to run this function every time the worksheet selection changes. If you pick a different workbook, you'd want to see a new list of fields. So we'll add it to a watcher on the worksheet variable so that any time worksheet changes we run getFields:
watch: {
  worksheet: function(worksheetName) {
    this.getFields(worksheetName);
  }
}
The next two options are for formatting and are just simple inputs. Finally, we need a function for the button that takes all the inputs and saves the values to the settings.
save: async function() {
  tableau.extensions.settings.set("delimiter", this.delimiter);
  tableau.extensions.settings.set("buttonLabel", this.buttonLabel);
  tableau.extensions.settings.set("worksheet", this.worksheet);
  tableau.extensions.settings.set("fields", JSON.stringify(this.fields));
  await tableau.extensions.settings.saveAsync();
  tableau.extensions.ui.closeDialog("");
}
Here we're just setting a few variables with data. Note that the data must always be a string, so you'll notice I'm stringifying the fields array of objects. This concludes the basics of the configuration page. Next, we'll look at how the actual copying gets done.
Copying data
Now that we have all the information we need from the dashboard author we can set up the copy button. First, let's set up the copy function. Once we grab the worksheet (based on the settings!) we can get the summary data. The way the data is structured requires us to know the index of the field we want in order to grab the right data. So let's create a list of indexes based on the selected fields:
let indexes = [];
for (let field of selectedFields) {
  if (field.selected) {
    const column = data.columns.find((column) => column.fieldName === field.name);
    if (!column) return (this.validConfig = false);
    indexes.push(column.index);
  }
}
Now that we have the index for each field, we can go through and grab the data. First, we'll loop through each mark in the data array and then we'll loop through the indexes and grab the right data from each mark:
let output = [];
for (let mark of data.data) {
  let markData = [];
  for (let index of indexes) {
    markData.push(mark[index].formattedValue);
  }
  let row;

  if (btoa(this.delimiter) === "XHQ=") {
    row = markData.join("\t");
  } else if (btoa(this.delimiter) === "XG4=") {
    row = markData.join("\n");
  } else {
    row = markData.join(this.delimiter);
  }
  output.push(row);
}
You'll also notice a bit of extra in this section besides just getting the mark data. I wanted to be able to set the delimiter to be a tab or a newline so if you use \t or \n as your delimiter this code will update it to be a real tab or newline. This code was a little tricky so I'm curious if someone has a better way to do this but I ended up base64 encoding the delimiter text in order to capture the input. This now enables folks to copy tables into Excel or Google Sheets easily:
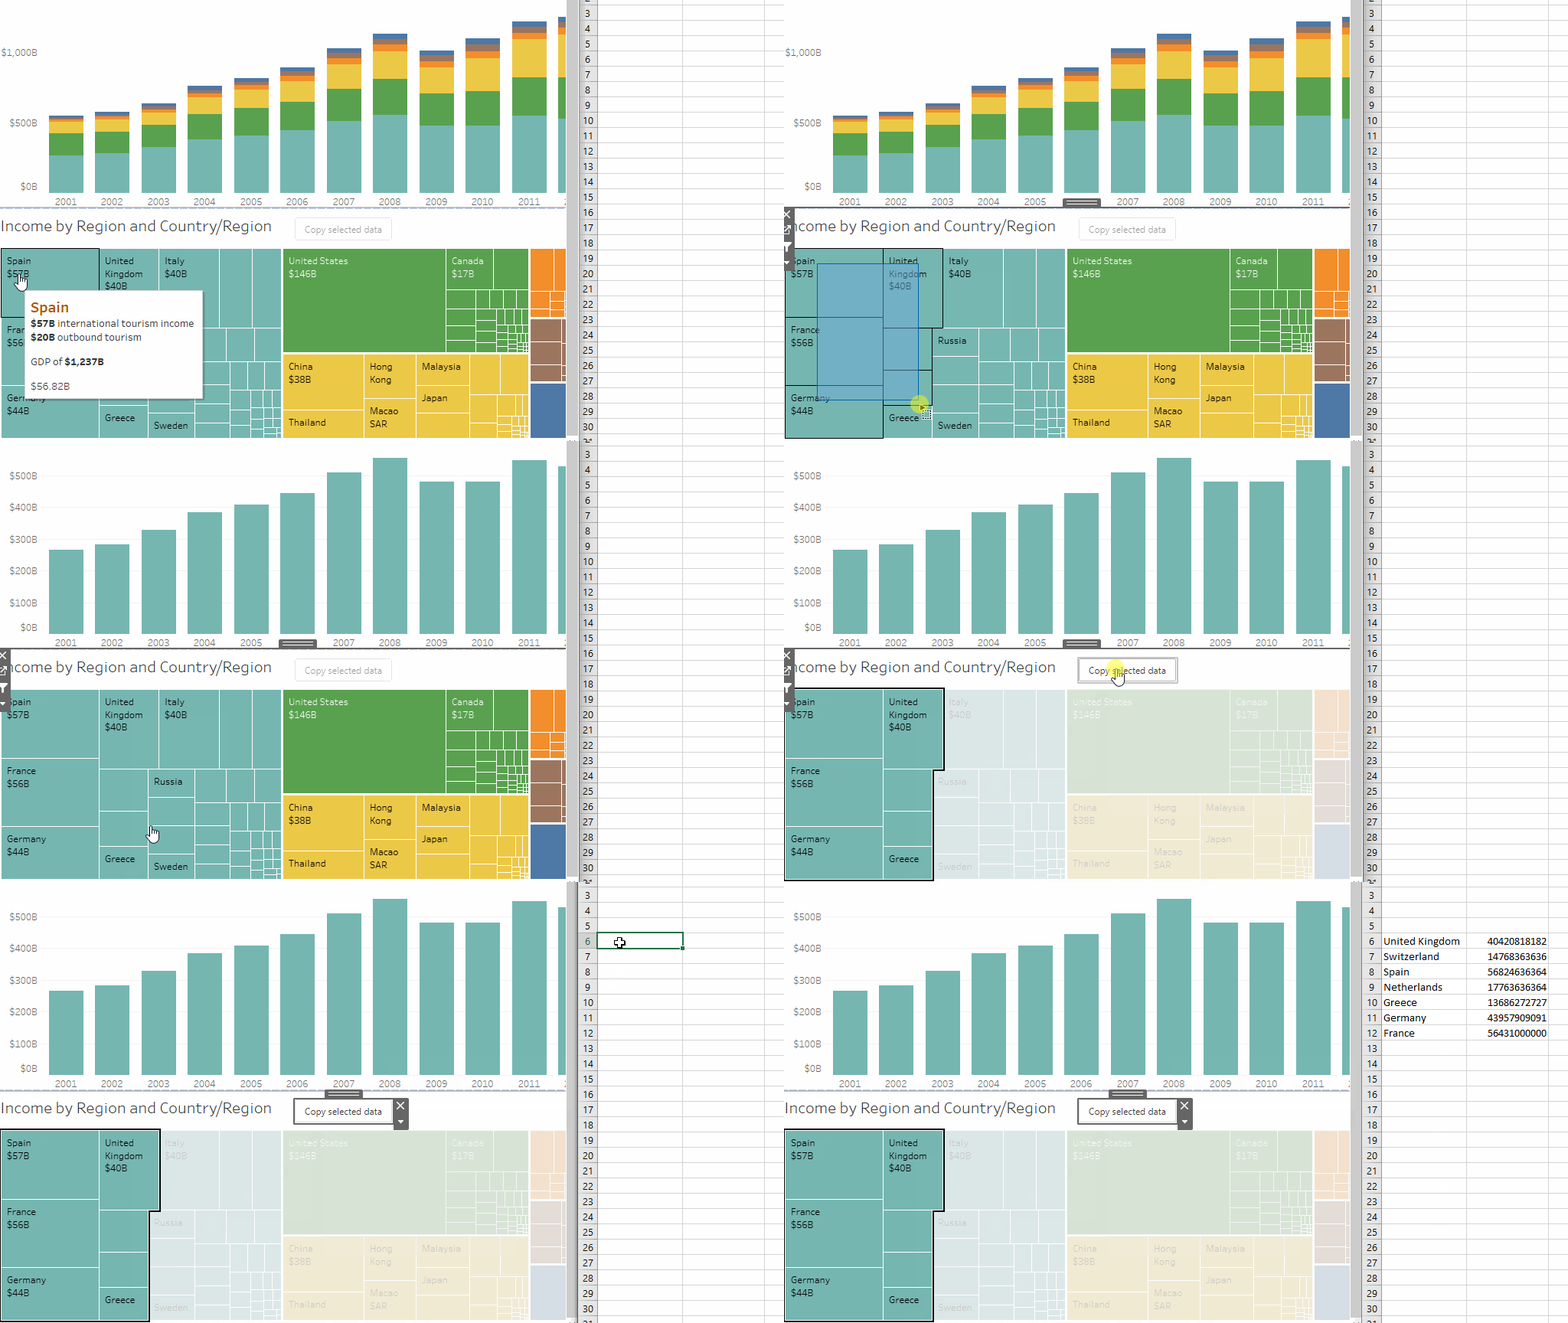
The last bit of the copy function is the actual copying part. This is some basic boilerplate code that creates an element (using a textarea since the text is multi-line), populates the element with the text to copy (adding newlines), selects and copies the text to your clipboard, and then deletes the element.
let input = document.createElement("textarea");
input.value = output.join("\n");
document.body.appendChild(input);
input.select();
let result = document.execCommand("copy");
document.body.removeChild(input);
Now that we have the copy function set up, we only want the button to be enabled when marks are actually selected. To do this let's add an event listener to the worksheet and listen every time the mark selection changes:
listen: function() {
  const settings = tableau.extensions.settings.getAll();
  const dashboard = tableau.extensions.dashboardContent.dashboard;
  const worksheet = dashboard.worksheets.find(
    w => w.name === settings.worksheet
  );
  if (!worksheet) return (this.validConfig = false);
  this.unregister();
  this.unregister = worksheet.addEventListener(
    tableau.TableauEventType.MarkSelectionChanged,
    this.countMarks
  );
}
Note that I have an unregister variable that holds the function returned by setting the event listener. I like to include this and call the function before registering a new listener to make sure we don't have duplicate listeners set at any time. The listener is using countMarks to handle events:
countMarks: async function(marksEvent) {
  const data = await marksEvent.getMarksAsync();
  this.markCount = data.data[0].data.length;
}
Here we just look at the data selected and set the markCount to the length (number of marks).
Finally, I've got a helper function called setup that checks the formatting settings and resets the listener. I use this on the first load and after configuration.
setup: function() {
  this.validConfig = true;
  const settings = tableau.extensions.settings.getAll();
  this.buttonLabel = settings.buttonLabel || "";
  this.delimiter = settings.delimiter || ",";
  this.listen();
}
And that's it, you can find the full code for this extension below so you can dive into it more. If you have any questions feel free to ask in the comments below! Learned something new? Subscribe and never miss a new post!
Subscribe
Sign up to never miss a post!

About Me
Subscribe
Sign up to never miss a post!
Popular Posts
A Quick Tableau Data Source Mapper
July 13, 2021Spotify Playlist Generator
November 29, 2021Topic Request
Want me to cover a specific topic? Let me know!
Leave a comment