Use Pipedream and Twilio to Get Texts About Tableau Server Events
May 11, 2021 - Automation, Tableau
Many times it's important to be notified of events that happen on your Tableau Server. Perhaps an extract has succeeded and you want to trigger another workflow to start. Or perhaps you're interested to see what new workbooks get added to a certain project. You could of course manually check now and then to check for changes but that would be tedious. Or you could try polling your Tableau Server multiple times an hour and then track the changes to see if there are any updates. But that also doesn't seem like a good use of resources. Instead, you can leverage webhooks! Webhooks work in Tableau Server and Tableau Online and let you send out a POST request to a REST endpoint when certain events happen. To find a list of the types of events you can use with webhooks, look at the developer documentation. As of the writing of this post, they include events for data sources, workbooks, refreshes, and users.
The goal
In this tutorial, I'll show you how to set up a webhook that will send you a text message whenever an extract refresh fails. You won't need to write any code to get it set up and you can even use or try all the tools for free! Once complete, whenever an extract refresh fails your Tableau Server will send a message to a Pipedream workflow that will then send you a text message using Twilio.
Prerequisites
- Tableau Server or Tableau Online - Webhooks are available in Tableau Server 2019.4+ and Tableau Online. If you don't want to test on your production server you can sign up for a free developer sandbox site by joining the Tableau Developer Program. You will need to be at least a Site Admin in order to modify webhooks.
- Pipedream account - Pipedream is a tool that lets you easily connect APIs while writing no or minimal code. They have a fantastic free tier that, as of the writing of this post, allows for 10,000 monthly invocations.
- Twilio account - Twilio is a popular messaging platform that we will be using to send text messages. They have a great free trial that you can use for testing!
- Mobile phone - You'll need a phone that can receive SMS messages.
- Postman - Postman, among many other things, is an API client that lets you send REST requests quickly and easily. The free tier is plenty enough for this tutorial and general API testing.
Create the Pipedream workflow
Before we can create the webhook in Tableau Server we need to have an endpoint that we want the webhook messages to be sent to. This will be our middleman between Tableau Server and Twilio. Once you've signed up for a Pipedream account start by creating a new workflow.
- The first thing we need to do is set up a new trigger to kick off the workflow. Since Tableau Server is going to be sending out a POST request we want to use the "HTTP / Webhook" trigger.
- Select the "New Requests" option and then select "Create Source" to generate your own unique endpoint. You should now see the first segment of your workflow with an endpoint that looks something like
https://123abc33e328fd43d6c5464e668.m.pipedream.net. Make note of the endpoint as we'll need it in the next step.
Set up your Postman environment
Now that we have somewhere to send our webhook messages let's set up the webhook in Tableau Server. To make this easy you can use the webhooks Postman collection provided in the Tableau webhooks documentation. Download the collection as well as the environment then follow the next steps to set it up.
- In Postman go to File > Import to open the import dialog. Then select "Upload Files" and choose the two files you just downloaded. You should then see them listed as a collection and an environment. Click "Import" to bring in the files.
- Next select the environment tab on the left (or the icon with a square within a square) and select "Tableau Webhooks". Make sure to edit the "Current value" column and add your Tableau Server address in the
servervariable. Make sure if you are using Tableau Online you include the pod, for example:https://10ax.online.tableau.com/. - Add in either your
usernameandpasswordor apat-nameandpat-secret. You can set up a PAT (Personal Access Token) on your "My Account Settings" page within Tableau. Make sure to store it somewhere as you are not able to see it again once created. - Type in your site
content-url, this is the name you see for your site in the URL:https://10ax.online.tableau.com/#/site/myawesomesite/home. So for example, your site name might be "My Awesome Site" but the content URL would be "myawesomesite". - Next add the webhook variables. First, give your webhook an easily identifiable name within
webhook-name. Next, set yourwebhook-eventvariable toDatasourceRefreshFailed. (List of webhook events). And finally set thewebhook-urlto the Pipedream endpoint you created previously. Remember it should look something likehttps://123abc33e328fd43d6c5464e668.m.pipedream.net. - Hit "Save" in the top right to save your variables and then click the three dots icon and choose "Set as active environment".
Create a webhook in Tableau Server
Now that we are all set with the environment variables in Postman we can use the Tableau Webhooks Requests collection to easily set up the webhook.
- Open the collections tab (the icon that looks like a folder) and select the "Tableau Webhooks Requests" collection. Choose either the JSON folder or the XML folder, both will work for this tutorial.
- Select either the username and password sign-in request or the personal access token sign-in request. This will depend on if you entered your username and password or a personal access token in your environment variables. Click the blue "Send" button and if it is successful you should get a response back at the bottom with an access token. This access token has automatically been added to your environment variables and will be used in the next requests. To learn more about authenticating and using the Tableau Server REST API, take a look at the documentation.
- Once you've successfully signed in select the correct "Create webhook" request based on your version of Tableau Server and click the blue "Send" button. If this request was successful you should see the details of your newly created webhook in the response below.
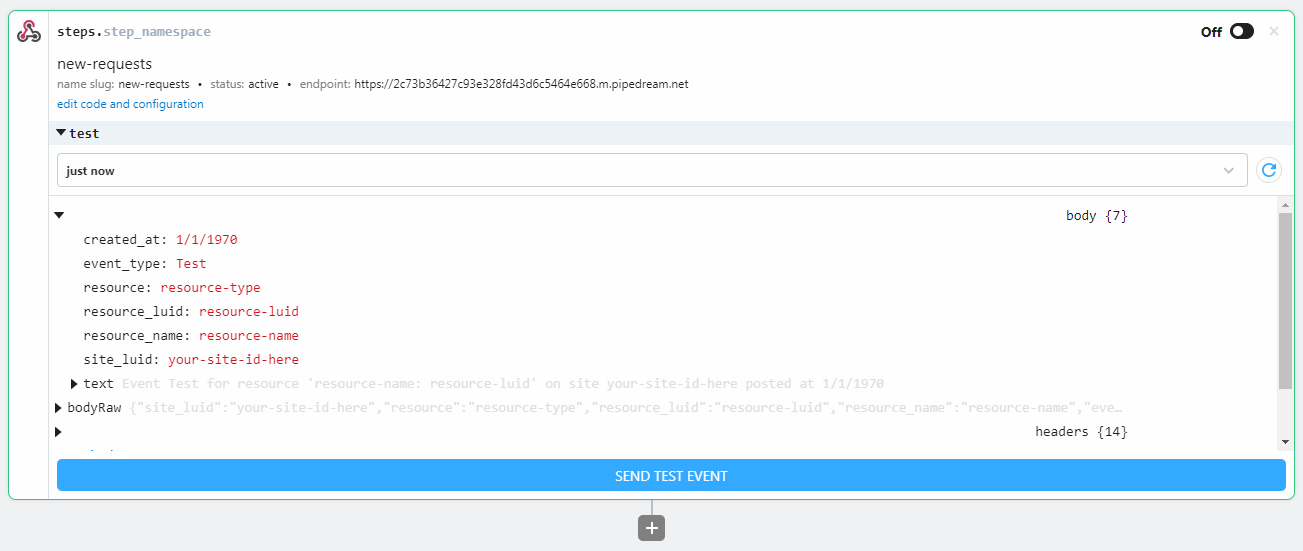
- At this point we can send a blank message to test that everything is configured correctly in Tableau Server. Copy the id of the newly created webhook that you should see in the response. (Make sure not to copy the owner id!) Go back to the environments tab and select the "Tableau Webhooks" environment and paste the id into
webhook-id. Save the environment then go back to the collections tab. Choose the "Test a webhook" request and click "Send". If it was sent and received successfully you should see "success" in the body and a 200 status. (Note: This may be different if you changed the default options of the Pipedream trigger.) - Go back to your workflow in Pipedream and you should see that a request was received! You can see the parameters that were sent in the body of the message and we can use these to configure the next part of the workflow.
Add Twilio to your workflow
- Add a new step to your Pipedream workflow by selecting the plus at the bottom of your trigger and searching for "Twilio" in the list of actions.
- Select the "Send an SMS" action and then click the "Connect to Twilio" button to link your account. Here you will need to add a
Sid,Secret, andAccountSid. Follow the Twilio instructions to create a new key, a Standard key is enough for this tutorial. Once you've obtained the key you can add theSidandSecretinputs. Make sure to store the secret somewhere as you are not able to see it again once created. You can find yourAccountSidon your main Twilio dashboard. Once you have that entered select "Save". - Next, enter your phone number as the destination to send the text to. Then enter your Twilio phone number as the sender. If you haven't set up a phone number in Twilio you can do so in the main dashboard console.
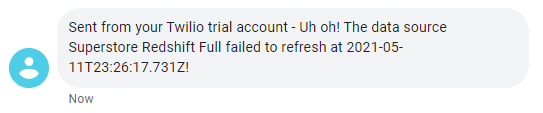
- Finally, craft the message you want to send in your text. Here is where you can use the data that was sent in the message from Tableau so you know exactly which extract refresh failed and when. You can use the user interface for the event body from your test earlier to help you craft the message or simply type
falsefor each property you want to use in your message. For example:Uh oh! The data source failed to refresh at !. You can see all the properties of a webhook message in the documentation. - Once everything is filled in click the blue "Deploy" button at the very top of the page to save and deploy your workflow. Finally, click on the black toggle (labeled "Off") that is on the trigger step to activate the trigger so it is listening for incoming requests.
Test your webhook workflow
At this point, you can either resend the "Test a webhook" request in Postman to receive a message or you can set an extract refresh to fail (perhaps by changing the password in the connection settings to something incorrect) and then select "Run Now" in Tableau Server. Once you've done this you should receive a text message with information about the extract refresh failure!
Note: If you are running an earlier version of Tableau Server your test message may not include the properties as displayed here in this tutorial. You should test your setup by inducing a real extract failure instead of just the "Test a webhook" request
Next steps
I hope you were able to use this tutorial to get started with webhooks and tools like Pipedream, Postman, and Twilio! This of course is the most basic notification you can set up with Pipedream. However, Pipedream allows you to customize the code for your pre-built action nodes or create your own custom code with Node.js to build out more complex flows. Some things you could do to expand on this tutorial would be to write code that sends a message only for certain data sources or changes the destination phone number based on the data source that failed. Let me know in the comments if you'd like to see more of these types of tutorials and if you were able to successfully set up your webhook!
Learned something new? Subscribe and never miss a new post!
Subscribe
Sign up to never miss a post!

About Me
Subscribe
Sign up to never miss a post!
Popular Posts
A Quick Tableau Data Source Mapper
July 13, 2021
Spotify Playlist Generator
November 29, 2021Topic Request
Want me to cover a specific topic? Let me know!
Leave a comment